SensibleAI Forecast Data Load Build Items
Overview
This article provides a step-by-step guide for setting up data integration between SensibleAI Forecast (FOR) and OneStream. It builds upon previous documentation on creating a Connector Business Rule, outlining clear instructions for establishing a Data Source, defining Transformation Rules, and configuring a Workflow Profile within OneStream. By following these steps, users will successfully map and load forecast data from FOR into the OneStream platform, ensuring accurate, efficient, and automated data transfer for seamless forecasting and reporting.
Step-by-Step Process
Step 0: Connector Business Rule
To get data from SensibleAI Forecast (FOR) into OneStream, we need to build out a few objects in OneStream. The first of which is the Connector Business Rule. This was documented in a previous article titled SensibleAI Forecast Connector Business Rule. Please read that article as a predecessor to this one before beginning to build out the following items.
Step 1: Setup Data Source
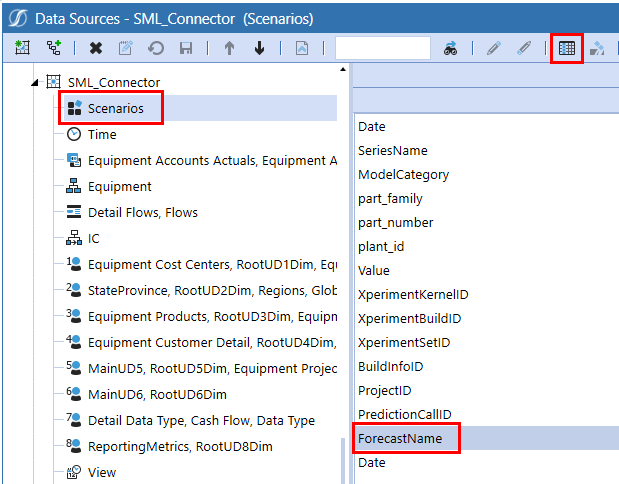
First, navigate to the Data Sources page in the Application tab of OneStream. We’ll start by clicking the button on the top left corner of the screen ![]() ('Create Data Source'). On the pop-up window, fill out an appropriate name and description for your data source, select “Connectors” for the Data Source type, assign it to the Cube that we will be loading to, and you can either leave “Scenario Type” to '(All)' or set it to the Scenario Type of the Forecast Scenario we are loading to. Once filled out, it should look similar to the following:
('Create Data Source'). On the pop-up window, fill out an appropriate name and description for your data source, select “Connectors” for the Data Source type, assign it to the Cube that we will be loading to, and you can either leave “Scenario Type” to '(All)' or set it to the Scenario Type of the Forecast Scenario we are loading to. Once filled out, it should look similar to the following:

Note that “SML” was the old short code for SensibleAI Forecast prior to the product being renamed.
Once created, the Data Source will automatically display all of the OneStream dimensions that need to be assigned a column or value. Remember, there are 16 dimensions in every OneStream Cube. Every line of data that gets loaded needs to be assigned a member for each of these dimensions.

For each dimension, we will typically utilize one of two methods for populating them:
Method 1
Assign the dimension to a Connector Field. If a OneStream dimension corresponds to the members in one of the fields/columns of our FOR table, all we have to do is assign it accordingly. Simply click on the dimension, select a field in the list of Connector Fields that we defined in our Business Rule, and click the button on the toolbar labeled “Apply Selection“ ![]() .
.
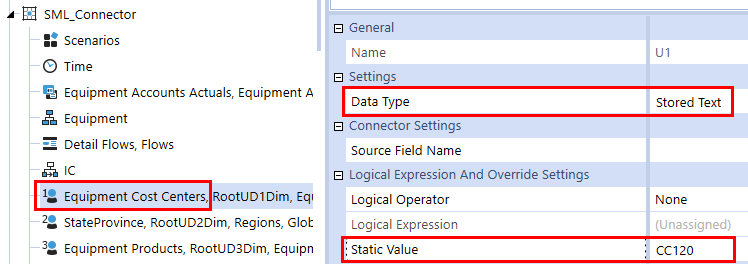
Method 2
Hardcode the dimension to a single member. This would be the case if we are sending all FOR data to a single Entity or a single Cost Center for example. To hardcode a specific dimension to load to a single member, we first select the dimension and set the “Data Type” to ‘Stored Text’ for our selection. Then, in the “Static Value” field, we key in the member’s name we want to send all the data to. It will end up looking similar to the following:
Once we’ve assigned all our dimensions to either a field in the list of Connector Fields or a specific member, our Data Source can be considered done.
Step 2: Build Transformation Rules
Transformation Rules are what map our original “source” members to our OneStream “target” members. Every member that is defined in the source file/table must be defined in some way in OneStream. However, it doesn’t always have to be a one-to-one mapping. Transformation Rules are also where we can do implicit aggregations upon loading the data to the OneStream Workflow.
We start by selecting the button on the top left-hand side of the screen called “Create and Populate Profile” ![]() . This will create a new Transformation group for each dimension (similar to the way the Data Source created them), as well as assign them to a Rule Profile. This is vital because a “profile” is what gets assigned to the Workflows for use/display to the end users (this is the case with all areas of OneStream; Data Sources, Transformation Rules, Cube Views, Dashboard, etc.).
. This will create a new Transformation group for each dimension (similar to the way the Data Source created them), as well as assign them to a Rule Profile. This is vital because a “profile” is what gets assigned to the Workflows for use/display to the end users (this is the case with all areas of OneStream; Data Sources, Transformation Rules, Cube Views, Dashboard, etc.).
Learn more about FOR to OneStream member mapping in the article titled “SensibleAI Forecast Mapping to OneStream Metadata“.
Once the mapping rules have been built out appropriately for each dimension, the Transformation Rule Profile can be considered complete. It will look similar to this with each of the dimensions containing rules to map their source member to OneStream target members:

Step 3: Configure Workflow Profile
Once we’ve created our Data Source and Transformation Rules, we need to assign them to the Workflow profile that we are using to load our data.
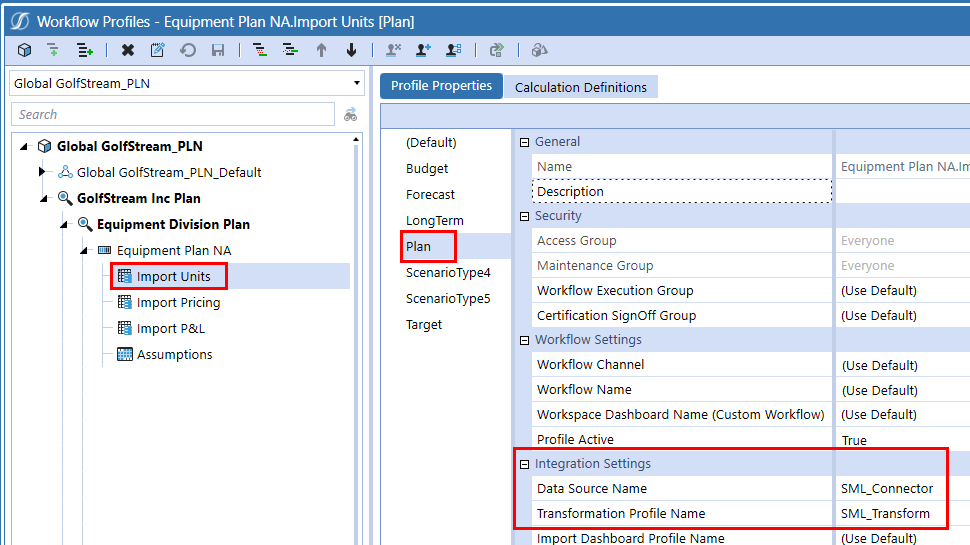
Navigate to the Workflow Profiles page in the Application tab and find the appropriate Workflow Profile. Make sure to select the Scenario Type that we are loading to when making these edits. Under “Integration Settings”, set our ‘Data Source' name to the Data Source we created in the first step and set our ‘Transformation Profile’ name to the Transformation Rules Profile we created in Step 2. Once these have been set, the Workflow profile will look like the following:
Once we’ve finished building out our Data Source and Transformation Rules and assigned them to our Workflow Profile, we can navigate to our Workflow in the OnePlace tab and kick off an Import to see our data load into Stage. We can now consider our connection from FOR to OneStream finalized and complete.
